Think:
"Who is in my web audience & how are they
approaching my site?
How are they looking for my information?
And how can I help them find my information?"
Not:
"Let me put lots
of unnecessary information to make my
department look important."
____________________________
Think:
“information"
Not:
"department"
ie. Instead of titling your page:
“Office of Financial Aid”,
title it: “Paying for College”.
____________________________
HOW CAN I
LEAD STRANGERS TO MY INFORMATION
IN A CLEAR AND CONCISE MANNER?
Make
your site appealing & navigable to its intended users,
not to people who know how TSU is organized.
How TSU is organized is irrelevant to most of your web-users.
____________________________
Architect Your Data! Analyze
your content. Then group it into categories. Place categories on your
leftnav, not "everything under the sun"!
AIMS OF NEW SYSTEM & DESIGN
-
Consistency in both look and feel on ALL web pages. Same fonts on all web
pages for titles, subtitles, and text. Same colors for highlighting or setting
apart. The entire goal is to look like a uniform and well-maintained
university.
The TSU homepage projects a particular image of TSU. Departments
may not interrupt this image-projection by insisting that certain content be
present on the homepage.
CONTENT GUIDELINES
AIM:
Consistency in both look and feel on ALL web pages.
Consistency means:
1)
same font for page content (Tahoma; size 12)
2)
same background color for accenting areas (#d1d7db)
3)
one image above fold - 250 wide
FILENAMES
The filename can help you to have good URLs for marketing.
Do not use hyper-punctuation. For example: one
exclamation point is enough. We are an institution of higher learning. If we
cannot express ourselves with our vocabulary and normally-punctuated content,
we are most to be pitied.
(ex: Use: “Good News!”
instead of: “Good News!!!”)
***Remember: the web
is a publication of TSU!
BOLD TEXT
Do not make lots of text bold. Only headings and items that are
truly being emphasized should be bolded. Ten items in a single paragraph
CANNOT possibly all need to be emphasized!
CAPITALIZATION
Do not use ALL CAPS too frequently. It should be reserved for
headings and true emphasis of words.
COLOR USAGE
Black is the chosen color of text.
No flashy colors. This will be strictly enforced. We aim for
consistency and calmness.
To set apart a column of a table, use the background color:
#d1d7db.
CONTACT INFO
Always offer contact info for the student to receive additional
information from you. “Contact Us” must be the last item in the leftnav….so
that it is consistent across the TSU website.
FONT & SIZING
Tahoma 12pt
The system automatically makes your text Tahoma font – size 12.
And it handles your sub-titles and Titles automatically as well.
Web Services will be reviewing sites and will alter any
not following this consistent pattern/design.
IMAGES
1.
Non-bordered images
2.
No stretched/non-proportionate images
3.
One main image in page content. Do not clutter page with multiple images.
Keep a clean look.
4.
In the “Appearance” tab, be sure to NOT enlarge an image size there....as it will make it blurry.
NOTE: You are
able to copy all content from Word, Excel, etc. into OU, but not images.
MARKET TSU'S PROGRAMS –- GUIDE THE STUDENT TO APPLY TO TSU!
Offer the student opportunity to:
·
contact someone in your department for more information
Program information should appear in basically the same general
place for every department…so that web-user knows where to look. Follow
example: https://www.tnstate.edu/example
Must-haves
in leftnav:
College
Name OR "Adminstrative Offices"
Name
of Department
"Degree
Programs" (must appear in leftnav directly under Name of Department)
"Contact
Us" (must be last item in leftnav)
REPEATING INFORMATION
Do not repeat information. Have it available clearly and easily
navigable and consistent….rather than posting the same information in several
different places.
SIMPLIFY TEXT
Make the words or phrases into links instead of text saying “Click
here for details.”
For example:
Graduate Application (instead of “Click here
for graduate application.”)
You’re dealing with a highly Internet-savvy audience. Treat them
as such!
UNDERLINING
Only links should be underlined. In the web world, underlining
means "this is a link".
BLUE
LINK COLOR
Do not make text the same blue color
of web-links. Web-users will think it’s a link when it’s not.
Set up an account for your department first. Be sure to not
make the account in your own name. You may leave the university; but your
department will not. ;-)
After creating an account, you can then begin to set up your
form. It's fairly straight-forward.
CREATING A FORM
Choose to create a “Form”. Google Docs will lead you through it very simply.
And when finished, you’ll have an online form that saves all your submitted
data into a spreadsheet on Google Docs. You’ll be able to download the
spreadsheet at any time.
Here is an test example that I previously did of a Google Docs form. Of
course, you’ll set yours up to acquire only the data that you want (email
address, name, etc., etc.). Remember, we are not allowed by policy to obtain
secure information (especially not Social Security #s).
To see the submitted entries, you will login to your Google Docs account and
download the spreadsheet of all of the entries.
EMBEDDING A FORM, CALENDAR OR PRESENTATION, ETC. ONTO A WEB PAGE
If you want to embed a form, calendar, Powerpoint presentation, etc. onto a webpage,
first, get the Embed code. Then, follow the steps mentioned on this video.
Okay. So now, you can have a
brand new form in Qualtrics. You’ll find it much, much easier to use
and update. It will replace your old/existing one. But you need
to test it out first….and make sure you can access its data/form-responses,
etc.. Will you do the following:
Login to your Qualtrics
account. You should still have the email from Institutional Planning that
mentioned your password. www.tnstate.edu/qualtrics
Once you’re logged in, a yellow
notification box that may appear. If so, just "X" out of it.
You should see your form listed
under “My Surveys”.
In Qualtrics on the line for
your form, click “Send”. You will see a link for your form. This is the
URL that needs to go on your web page (so web users can click it to use
your form).
Click the URL & fill out
the form (to test it). After submitting the form, look to see if you can
view your results as mentioned below.
NOTIFICATION OF SUBMISSIONS
Of course, you’ll get an email each time someone submits your form.
To alter who gets an email:
Edit your form
Click “Advanced Options” on the right-hand side.
Click “Triggers” and “Email Triggers”
Click the text with “Send” in it. (Or you can add another email via
“Add Another Trigger.”)
VIEW RESULTS
In Qualtrics, click “View Results” and click “Download Data”……to download a
spreadsheet of the data that has been submitted for that form.
OR
Just look at all the emails in Outlook that you have gotten from form
submissions.
QUALTRICS TIPS:
The following instructions show how to create a new form in Qualtrics; but
they may help you to update your existing form a bit too. https://www.tnstate.edu/ouguide/#qualtrics
EDITING FORM
By clickinging "Edit" you can alter wording, add a new
question/field, etc. anytime you like.
TIPS: The following instructions
show how to create a new form in Qualtrics; but they may help you to update
your existing form a bit too. https://www.tnstate.edu/ouguide/#qualtrics
Click “Create Survey”
Click “Quick Survey Builder”
Name your Survey
If you want to store it in a particular folder name, enter the folder name.
Click “Create Survey”
Do the following for as many
questions as you have:
Click “Create new item”
Over on the right, you’ll see a
green rectangle, choose from it what type of question you are asking:
Text Entry or Multiple Choice.
Enter your Question.
If your question is multiple
choice, enter your Answers too.
REPEAT the above 4 steps for each question you have.
Click “Preview Survey” if you’d like
to preview it. (Just close this window when you’re finished previewing)
If you’d like to edit any questions, go ahead and do so.
Click “Launch Survey”
Click “Activate your survey to collect responses”
You will be provided with a link to the form that you can put on your website
or in emails, etc. to ask individuals to submit your form.
TO EDIT FORM (add
additional fields, change fields)
Click “My Surveys” at the top…. and then, click your form’s name in the
listing that displays.
TO SEE FORM ONLINE
When you go into Qualtrics…
click the “My Surveys” tab
Click your form in the listing
Click “Launch Survey” near the top
It provides you with the link to your survey. This is the link that you
can put on your website after you have the form working as you like it.
…and create an account for your dept (unless your dept already
has an acct).
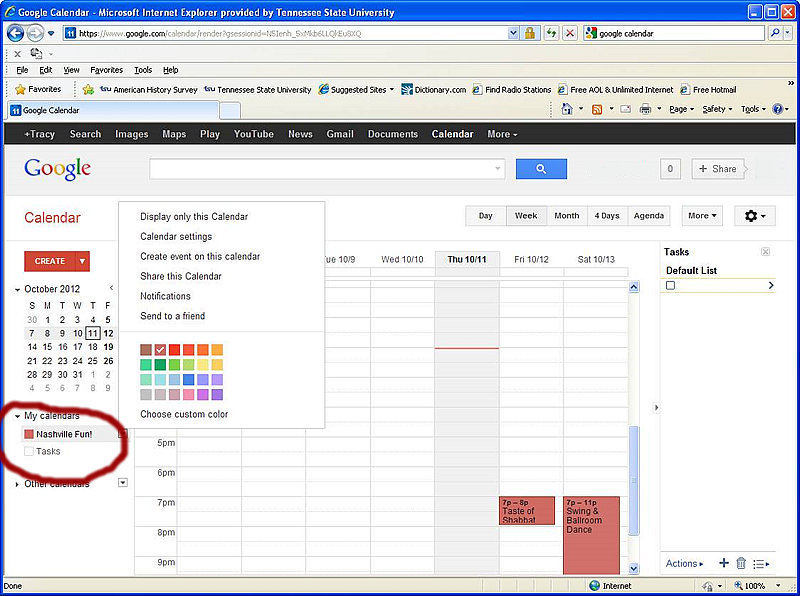
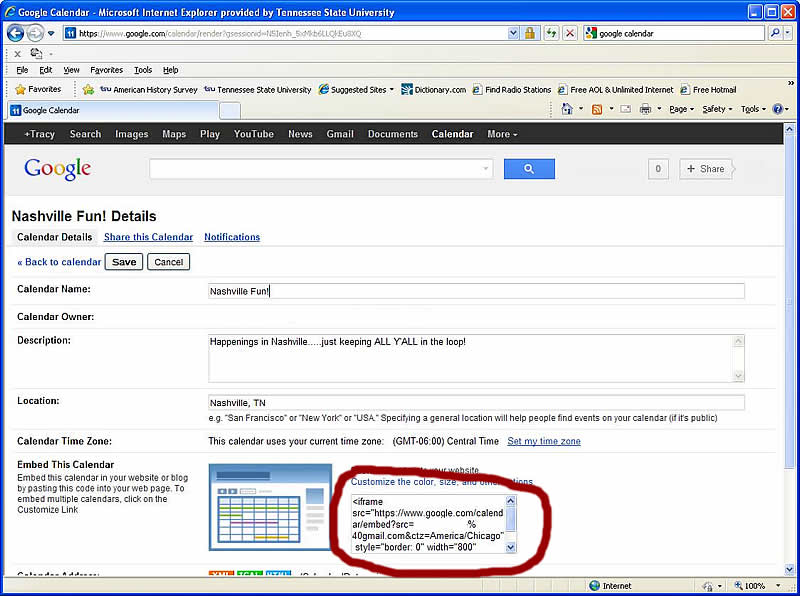
Then, create your calendar.
After you create it, do this to get the its embed code:
In the top right, click the Gear icon and choose Settings.
Click the Calendars tab.
Click the name of the calendar you want to embed.
In the "Embed This Calendar" section, copy the iframe code displayed.
Open your website editor, then paste this code where you want the calendar to display.
Your embedded calendar will only be visible to people you've shared it with. To allow all visitors to see your calendar, you'll need to make it public.
The University uses the calendar-system, CBMS, to handle the
university’s main calendar. Should you want your department's events to show
up on the main university calendar and therefore on the homepage, contact Events Management.
First, create the appointment on your calendar & save it as a file --
First, create an appointment for a meeting on your TSU Outlook calendar… being sure to put the proper:
Location
Date
Time range
Advance reminder
Then, “save & close” as usual.
Re-open the calendar-appointment that you just created.
In the upper menu, click “File” and “Save As”.
In the filename field, enter the appointment’s name (don’t put any spaces or special characters, but dashes are okay.) FILE-NAMING CONVENTIONS
For a board meeting that occurs on June 15, 2017, put “BOT_2017_0615”.
For a finance committee meeting that occurs on Aug 6, 2017, put “FIN_2017_0806
(Be sure to keep the leading zeroes on the single-digit months and days like shown above: “0806” for Aug 6.)
For “Save as type”, choose “iCalendar Format”.
On the left-hand area where the file-listing is, go to the place on your PC where you want to save your BOT calendar invites on your own computer (should be in your “BOT Website” folder in the “calendar” folder.)
Click “Save” at the bottom right….
Second, make the link on your webpage to your calendar appointment file --
In OU Campus, while editing your web page, type the text “add to calendar” because you want to make it into a link.
Highlight the text that you just typed.
Click the chain-link icon in the top menu.
Beside the “Link URL” box, click the reddish browse button.
Click into our “calendar” folder.
NOTE: If you just created your calendar-appointment-file and saved it on your PC, then it is not yet in OU Campus. So you must upload it into the “calendar” folder.
So to upload it, click “Upload”
Click “Add” and search for and choose the calendar-appointment file that’s on your PC.
Click “Start Upload”
Click “Close”
Your appointment-file will be already highlighted/selected in the list on the left.
Click “Insert”
Click “Insert” again.
To setup the ability to accept payments online, you must first setup an account with the TSU Bursar. The Bursar then contacts Web Services to let Web Services know the feature is ready to be embedded onto your website. Web Services will then embed it onto your webpage. View details on how to get this started>>
While editing the web page, you’ll see a blue bar labeled “Cards”. Click that to get the edit-button for that set of Cards.
You’ll see a “Group” for each Card that is on the page (1 Group = 1 Card).
So if you have 3 cards on the page, you will have 3 groups.
Each group/card has settings for itself, which you may edit, if necessary.
TO ADD AN ADDITIONAL CARD
Go to the bottom & click “Add New Group”. Then enter the data for the new card, to match how it’s setup for the other Cards/Groups above.
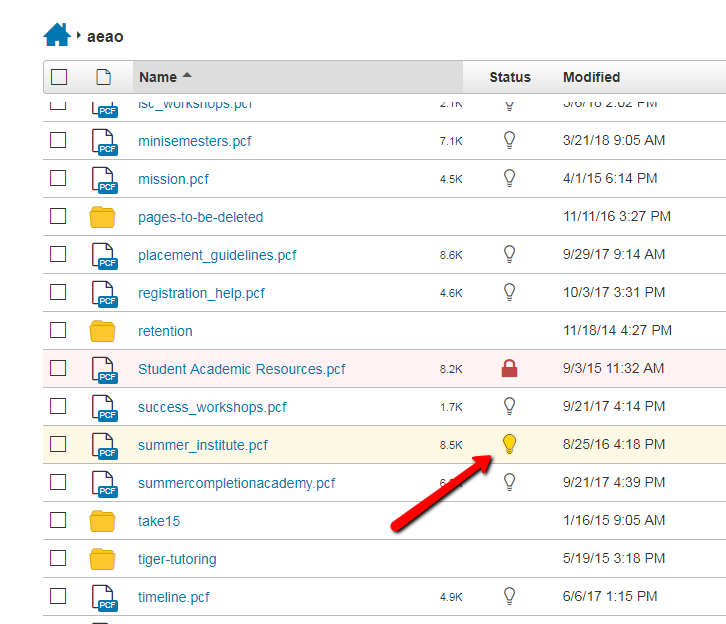
“My
co-worker says that OU Campus says that I have a page checked out. How
do I check it back in?”
Login to OU Campus ( How to login )
In OU Campus, click the"Content" tab at the top and choose "Pages".
In your file-listing, notice that any file that you have edited, but not published is still checked-out to you, and therefore, has a yellow lightbulb. So, just click the yellow lightbulb to
turn it to white….which will check in the file so others can edit it. Then, just inform your co-worker that you've checked it back in!
PLAN
OF ATTACK: Review
existing material and deciding what to copy onto your website. Plan the
layout of it.
REVIEW
YOUR EXISTING CONTENT
First: Create a
folder on your PC named “Website”. Within it create two folders: “images”
and “documents”.
Then gather all of your PDFs, Word
docs, images…everything that is not text on a webpage. Save them to your PC
into the appropriate folder.
Powerpoint Slideshows -- If you
want to have all of your Powerpoint presentations in a particular folder,
make a folder named “presentations” and upload your Powerpoint presentations
to that folder.
HOW TO COPY IMAGES FROM WORD,
ANOTHER WEBSITE, ETC. INTO OU CAMPUS:
IMAGES
Initially,
right-click each image and save to your PC. Then, within OU Campus, upload
your images from your PC into your “images” directory in OU. By doing this
first, you’ll have your images in OU and will be able to easily add them to
your pages in OU.
DOCUMENTS
Upload all
of your PDFs and Word docs into the “documents” folder in OU Campus.
BEST PRACTICES
CREATE PAGES FIRST, THEN DO LEFTNAV
Create
all your webpages first. Then edit your leftnav. This way, when
creating your leftnav, you’ll be able to browse for your new pages in order
to link to them.
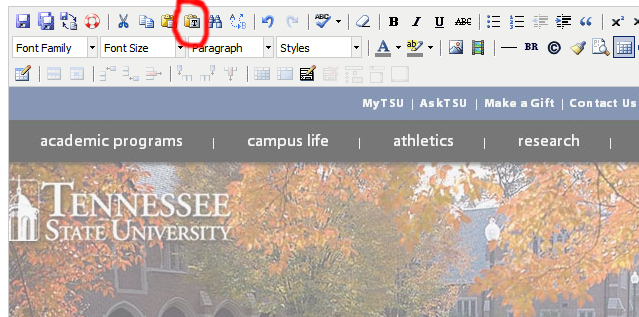
COPYING AND PASTING
CONTENT (ESPECIALLY FROM A WORD DOCUMENT)
Be
sure to always turn on the icon “Paste as Text” (as shown below in red) when you're copying content from Word or other packages and pasting into OU Campus. This is VERY IMPORTANT. It will eliminate bad
characters from the source code you are pulling over from Word, etc.
GETTING
FAMILIAR WITH OU CAMPUS
IMPORTANT
FACTS ABOUT OU
OU
has two tabs: Staging & Production.
Keep
in mind:
· Web pages are handled in the
“Staging” area/tab.
· Images are handled in the
“Production” area/tab.
SYSTEM
NAVIGATION
“New”
and “Upload” are relative to where you are in the system.
Notice
the navigation bar (breadcrumb indicating where you are in the folder
levels).
FILE-NAMING
This is very important. All filenames MUST BE:
·All lowercase
·Use short
filenames
·No spaces
·No underscores
·Separate words
with a hyphen. (though it's highly recommended that you use short names and
not use hyphens)
·Always have the
extension “.pcf”. (ex. campuslife.pcf or contact.pcf)
RENAMING
Note: When
you rename, you’re renaming on Staging, not Production. So not until you
re-publish will it take effect on Production.
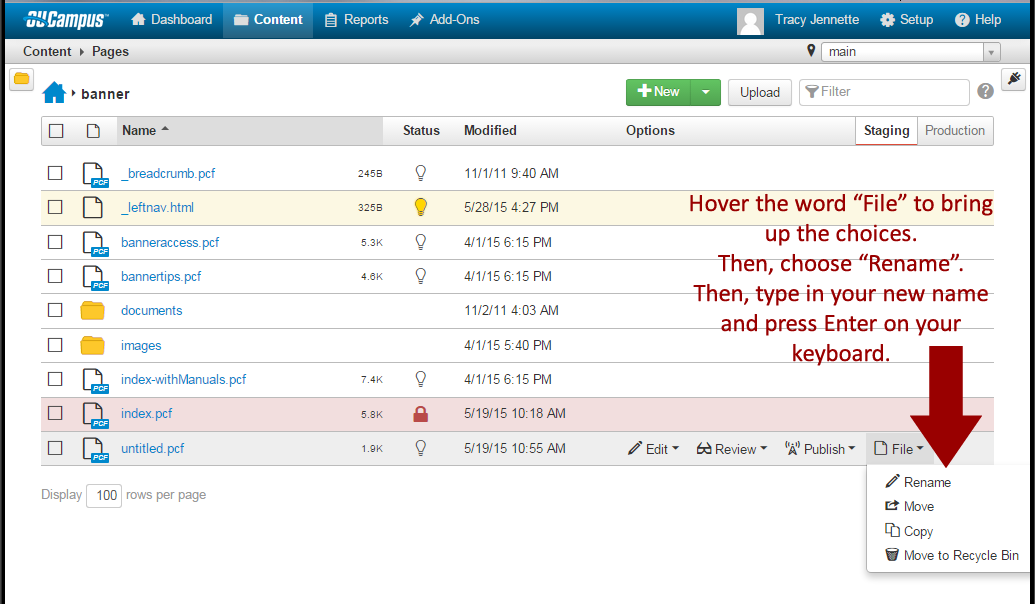
HOW TO RENAME A FILE:
In the file-listing, as shown on the image below, find your file name and on the line beside it, hover the "File" menu to bring up choices.
Then, as noted on the image below in red, click "rename" and type in the new name. Be sure to keep the extension ".pcf" in place!
And be sure to publish your file to the Live website after you've renamed it.
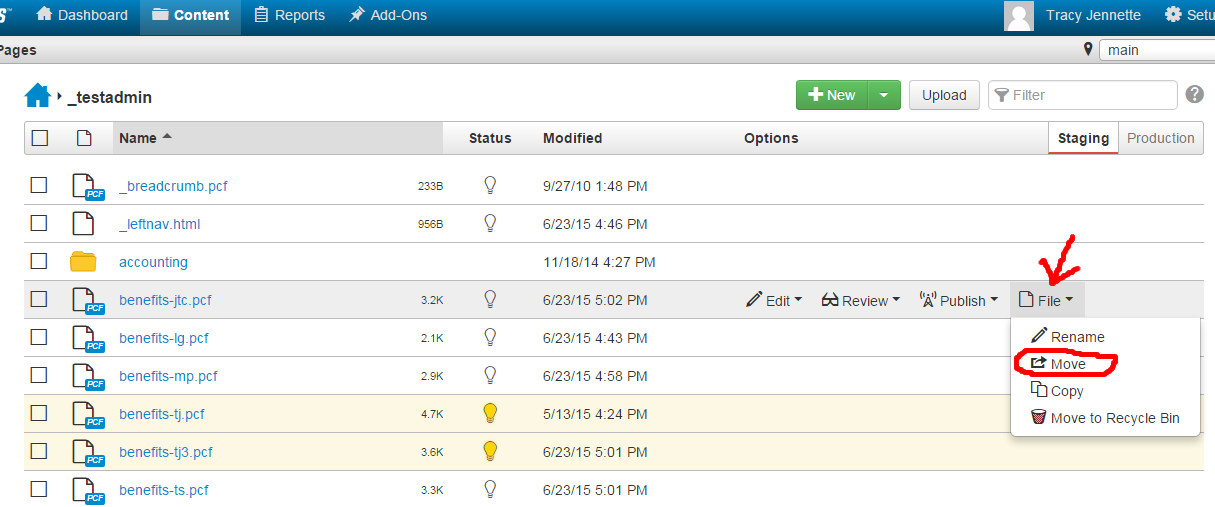
MOVE A FILE
To move a file to another area/folder (as the image shows below):
display a listing of your folders,
hover "File",
click "Move",
and choose where you want to move it to.
RECYCLING / DELETING
Folders
cannot be re-instated if they've been deleted.
When
you delete/recycle a file on Staging, it also deletes/recycle it on
Production.
And also,
just like your PC, when you delete an entire folder, everything in it gets
deleted.
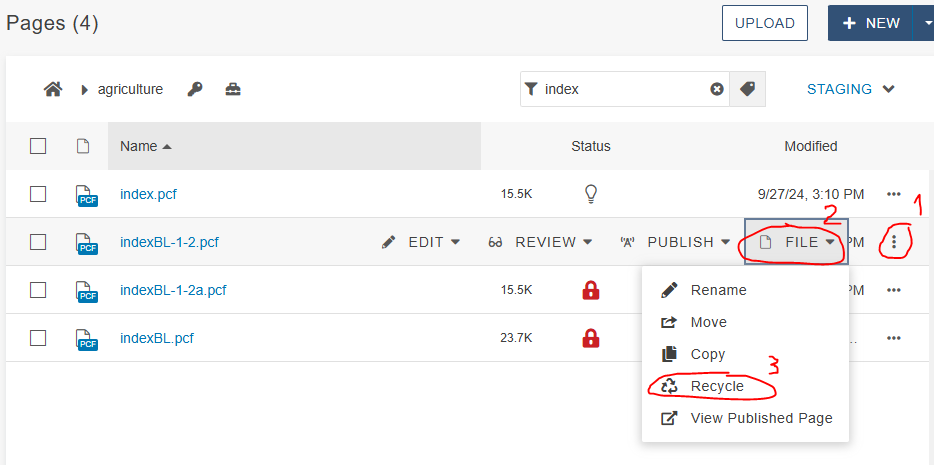
To delete a file (Illustration 1 below):
Login to your webpage via the "Last Modified" link in its footer.
Click "Content" and "Pages" in the top menu.
Confirm that you are in your department's folder.
In the file-listing that appears, on the line of the file (xxxx.pcf) that you want to delete, click the ellipsis on the far right...and menus will appear.
Click "File"....and then click "Recycle".
Moving it to the recycle bin will delete it.
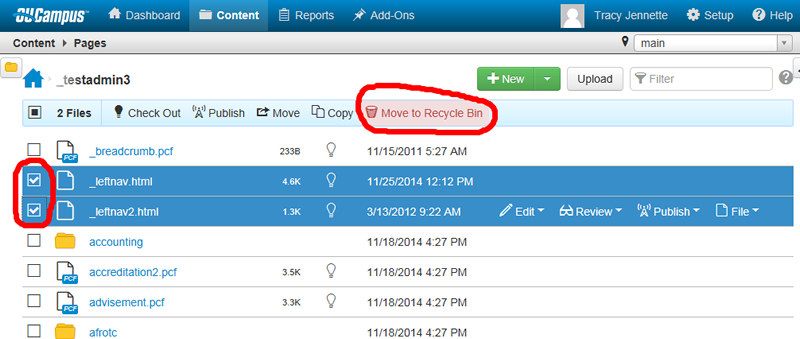
To delete multiple files at one time (Illustration 2 below):
Click inside the square box beside each filename and then click "Move to Recycle Bin" near the top.
The leftnav is a separate file just like your pages are. So it
has to be edited, saved, and published.
NOTE: When
you create new web pages, OU Campus automatically puts links to them in your
leftnav. But you have to publish your leftnav file in order for the leftnav
to become live on your website.
Also note that you may or may not want all of the links to be
in the leftnav. So, just delete those you don't want and add others you do
want. When you have your leftnav as you desire it, save it and publish it
(just like you do web pages).
"Degree
Programs" (must appear in leftnav directly under Name of Department)
"Contact
Us" (must be last item in leftnav)
Note: Be sure to publish all new pages that you create before
attempting to make links to them...or else you won't see them in the system
and you won't be able to make links to them.
To change items on your leftnav, it's just like changing links
in a Word document. You just make text into links. It's that simple.
To
change your leftnav:
It's SIMPLE.
First, login to your page like normal to edit it (how to login to edit)...and when you see the 3 small green edit buttons, click the one for the leftnav.
To add a new line to the leftnav, first create a new blank line...and then add a link to that line. How to do so is below:
How
to create a new blank line
If using Internet Explorer:
Click the text above where you want to put your new line. A box will appear.
Click your cursor at the very end of the text that is in that box....and press "Enter" on your keyboard.
A new line appears.
If NOT using Internet Explorer:
You make a new line the same way you make a new line in any software. Just go to the end of a line and press "Enter".
A new line appears.
How to make a link
Type
the text that you want in the leftnav.
Highlight
the text. Right-click it and choose "Insert/edit link".
Click
the red button to the right of the "Link URL" box and browse for
the web page that you are making a link for.
Click
it...and click "Select File".
Click
"Insert".
Voila! It's that simple!
*SAVE & PUBLISH: Your
leftnav will not display your new web pages on it until you have re-published
your leftnav file (_leftnav.html).
If you run into any problems with installing Firefox….or if
you’re unable to install software onto your PC, please submit a ticket with
the TSU HelpDesk here: https://www.tnstate.edu/cit/helpdesk.aspx
OU Campus uses your TSU network login and password...and not a separate OU Campus password.
NOTE THIS:
When entering your login-name, do NOT put the "@tnstate.edu" on it.
REMEMBER THIS! - There is no reason why you should get logged out of OU Campus!
WHY?
If you have two failed attempts at logging in, DON'T TRY AGAIN! Instead, re-boot the device/pc you're using and try again after a re-boot.
CAN'T LOGIN? DID YOU RECENTLY CHANGE YOUR TSU NETWORK PASSWORD? Remember, since the TSU network routinely notifies you to
change your password...when you indeed do change it, you MUST
re-boot your device (PC, cell phone, tablet) in order for OU Campus to re-sync with your new network
password...or else you won't be able to login to OU Campus! So maybe you're unable to login because you've changed your TSU network password sometime in recent weeks....yet you haven't re-booted your PC/device yet.
UNSUCCESSFUL ATTEMPTS: Three strikes and you're out! If you login unsuccessfully
3 times into OU Campus, your OU Campus account will get locked and you must
request that the TSU webmaster unlock your OU Campus account. So stop at two failed login attempts. Don't mis-login 3 times....or else your OU Campus account will get locked! Re-boot your PC instead!
GETTING ERROR MESSAGES WHEN LOGGING IN? - See below.
TO
LOGIN:
In a browser, bring up the page you are dealing with (not the TSU homepage).
Scroll to the bottom.
Click the “Last Modified” link.
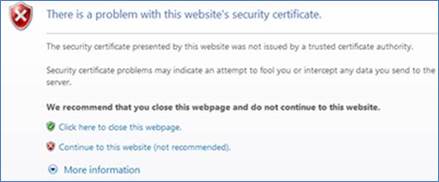
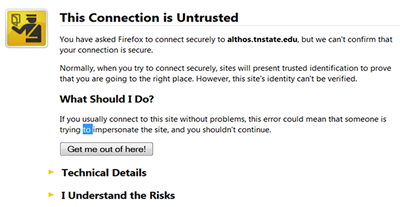
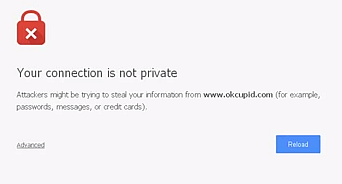
If you get
one of the following messages when you login, click:
"Continue to this
website"
OR
"I understand the risks"
OR
"Advanced" and then "Proceed"
Enter your network login (not email address) and
password.
I can't login! Help!
Re-boot your PC...and then try again using your current network
login/password.
Just remember to always use your current network login/pass to
login to OU Campus.
If
you still can't login, contact x7777 or www.tnstate.edu/trackit and ask
that your OU Campus account be unlocked.
ONCE
YOU'RE LOGGED IN:
IF YOU NEED TO EDIT A PAGE:
If you logged into OU Campus via the page that you want to edit,
you can click one of the little green buttons to edit your page.
IF YOU NEED TO EDIT A DIFFERENT PAGE
Click
the little green arrow pointing to the right (to enlarge your file listing)
IF
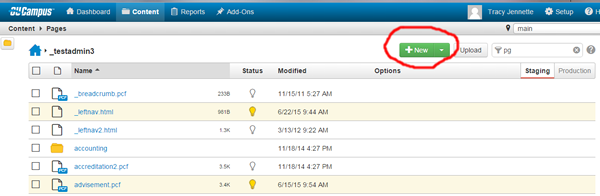
YOU NEED TO CREATE A NEW PAGE
Click
the little green arrow pointing to the right TWICE (to enlarge your file
listing so that you can get the "New" button on the upper
right-hand-side.)
First, you must have an image file on your PC to be able to
upload it into OU Campus.
HOW TO PULL AN IMAGE
FROM WORD DOC TO USE ON A WEB PAGE
NOTE: if you have an image that is in a Word document that you’d
like to insert onto your webpage, first save the image as an image file by
doing the following:
In Word, right-click the image and choose “Save as Picture”.
Save the picture to a particular place on your PC.
(Now you have an image file on your PC that you can upload into
OU Campus via the instructions below.)
1.While editing a page, click on your web page in the spot where you want the image
to be inserted.
2.Click the "Insert/Edit Image" icon (the mountain icon) in the editor-menu.
If you get a box that wants you to "Run" software, please click
"Run" to do so.
3.For "Image URL", click the reddish-colored button to browse for your image
4.Confirm in the file path that is listed that you're in your image
directory: "sites / main / myDept / images"
If you're not in your "images" directory, browse for it.
5.Click "Upload & Edit"
6.Browse your PC for the image you want to upload into OU Campus.
Highlight it and click "Open".
7.Now you have the opportunity to re-size it....which you'll
want/need to do most every time.
STANDARDS
FOR IMAGE SIZES
500 in size is a good size to make most images. But if you have some images in a vertical or horizontal row, so to speak, you need to see what size the existing images are before you re-size your new image...so it'll match.
-
Sizing Tip: 1 inch is approx = 100 pixels (this should help you to
re-size properly)
Click
"Resize".
Alter
the width to 500 or so.
Click
"OK"
Also, if you need to crop the image, be sure to do so.
Click
"Upload As"
Click "OK"
8.You should now see your image in the listing. Click it.....and
then click "Select File".
9.Enter an "Image Description" (ex: "Students on
Lawn" or "TSU Logo", etc.)
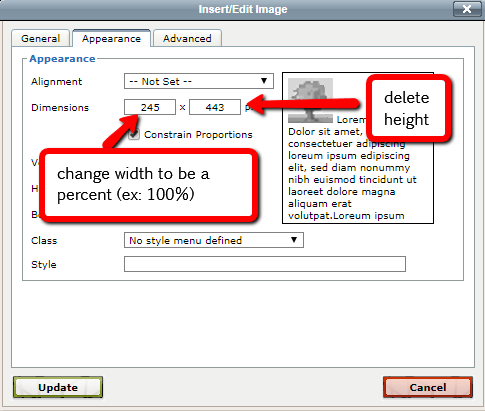
10.THEN ALTER THIS SETTING --
Click the Appearance tab.
Notice the width and height fields.
Alter its width to a percentage -- something like "25%"....or "75%" or "100%"....depending on how you want it to appear on the page. Test around with it. You can always change the percentage size to another percentage. Be sure to type the percent-sign in the field too! Then for the "height" field, delete it completely.
NOTE: if you have some images in a horizontal row, you need their heights to match in size. And if you have images in a vertical row/column, you need their widths to match in size.
11.Click
"Insert" to insert it onto your web page.
Voila! There it is on your page!
After your image is on your page, you can always right-click it and choose "Insert/Edit Image" and alter the percentage to be another percentage. Always remember to have the percent-sign with it!
1.Click
the tab at the very top entitled “Content” and click “Pages”.
2.Confirm that you're in your area in the breadcrumb. If not, navigate to your area/folder from the "main" root folder.
3.Click your "images" folder to go into it (so you can
upload your image into it).
4.Click the "Production" tab (upper right) because
images are stored there (not in Staging)
5.On
the upper right, click “Image/Upload”.
6.In
the box that pops up, browse for your image on your PC, highlight your image,
and click "Open".
7.Click
“Upload As…”
8.Click
“OK”….and your image will be uploaded.
9.You will now have the opportunity to resize your image -- which
you usually need to do -- especially if your image is large. (Remember: 250
pixels is recommended for main images on a page.)
Click "re-size" to resize your image. (Remember: 100 pixels is
about 1-inch wide)
10.Click
"Upload as" to upload your image (this places it into OU Campus
into your "images" folder)
Make sure you like the name and press "OK"
11.Voila!
Your image is now in your "images" folder.
Do
this for every image in your “New_Website_Images” directory that’s for this
particular web section…..in order to get all of your images into your
web-area so that you can work with them while creating web pages.
When
this is completed, click the “Staging” tab in the upper right to return to
your webpage-editing area.
NOTE: Images
must be uploaded to "Production", not "Staging".
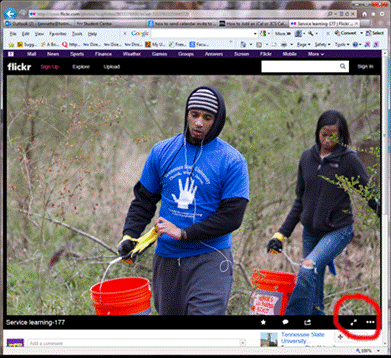
First,
find the image you like on the TSU
Flickr site.
(Note: If you can’t find an image that suits your department on Flickr,
fill out the images request form on this page: www.tnstate.edu/web.)
Click on the image until it is
the main image displaying (like shown below).
You should see 3 dots in the lower right-hand corner (as shown below in
the red circle).
Click the 3 dots on the lower
right of the image…..and choose “View all sizes”.
Click the link for: “Small 240”
Click “Download the Small 240
size of this photo”
…and a popup window appears in your browser.
In the popup-window, click the
arrow beside “Save” and choose “Save as”.
Choose a place on your PC to
save the image to…being sure to name it an appropriate name, and click
“Save”.
(Remember where you saved your image on your PC because you will have to
know that in order to insert the image onto your web page in OU Campus!)
Voila! You’re finished!
And you have a new image on your web page!
RE-SIZING IMAGES...
It's best to re-size most images that you are uploading into OU Campus. This way, you won't have terribly huge image files that take forever to load onto your web page. Once the image has been uploaded into OU Campus and you've inserted it onto your web page, you may want to alter its width for how to display on your page as well.
Free Graphics Software
(for handling images outside of OU Campus)
To crop or re-size images before loading them in to OU Campus, use Pixlr: https://pixlr.com/editor/. Note: the toolbar on the leftside of Pixlr has an arrow that you can click for more tools like "crop"
If the image is larger than
600 in width, re-size it to be 500. 500 is a good width to work with on the webpages. Pixlr support
HOW TO ALTER THE DISPLAYING OF IMAGES ONCE UPLOADED INTO OU CAMPUS --
Right-click the image and choose "Insert/Edit Image". (Or "go to the mountain" in the top menu.)
Choose the "Appearance" tab.
To make a large image viewable on all devices, you'll want to set the width to "100%" (or any other percentage...depending on how you want it to look on the web page) and delete the height.
Be sure to never:
make a small image larger (they get really blurry; it's best to go and get your original image and upload it again into OU Campus...and re-size it while you're uploading, making it about 500 in width. Be sure to "overwrite existing" so that you replace the previous image file.
grab the corner of an image and drag to re-size it.
Both of the above ways distort
the image.
HOW TO RESIZE PROPERLY:
To re-size your image, you always want to re-upload it into OU Campus by
choosing “Upload & Edit” (as mentioned above) and re-size while you’re
uploading!
Remember, a simple rule-of-thumb is
that 1-inch = about 100 pixels. So if you re-size an image to be 250
wide, it’ll be about 2 ½ inches wide on your web page.
BANNER IMAGES
If you'd like Web Services to install a new banner image for the top of your website, please send:
a single image that's high resolution in jpg format (not multiple images fused together)
image size: 1920wide x 720 high
image with students engaged in what your area specializes in
(pics of buildings are not desirable because they don't market our programs or student life well)
First, your video should be in the file format .mp4. If it's not, please ask the creator of it to convert it to .mp4. Or you can do so at Adobe or Online Convert.
Next, consider uploading your video to another site (like YouTube, Facebook, Vimeo). Videos work well when on these sites because they are fully optimized for best performance. After uploading to one of those sites, simply embed the link from that site onto your TSU departmental web page via the instructions below.
IF IT IS NOT POSSIBLE TO UPLOAD TO A SOCIAL MEDIA SITE --
You'll want to upload your video into your "videos" folder in Modern Campus.
(If you don't have a
"videos" folder, you'll want to create one first. Instructions on all things are below.)
In OU Campus, click the "Content" tab near the top. You will see a listing of your files.
Check to see if there is a "video" or "videos" folder. If there is not, create one by following the instructions below.
TO CREATE A "VIDEOS" folder: click "New" and "New
Folder" and name it "videos".
ONCE YOU HAVE A "VIDEOS" FOLDER
HOW TO UPLOAD YOUR VIDEO INTO OU CAMPUS
Then, go into the "videos" folder that you created (or into the one that already existed)
Click the "Upload" button (near upper right)
Click "Add" and find your video on your PC, choose it & click "Open",
Hover your video filename and choose "Rename"
Rename it to a simple name. Like if you had it named "Differential Equations of 2016 Research Platform.mp4", change it to "Differential.mp4". You don't want any spaces in the name and you want it to be simple and short.
Click "Upload.
Now your video should be in your "videos" folder.
Next, follow the instructions below in order to embed the video you uploaded onto your web page. And for "File/URL", click the search button to search for your video in your "videos" folder.
TO EMBED ONTO YOUR WEBPAGE:
Next, while editing your web page, do the instructions in the video below to embed your video onto your web page (Click the enlarge icon on the video below to enlarge the video):
First, click the "Content" tab at the top.....and choose "Pages"
In your file listing, go into your "documents" folder….or whichever folder you are uploading into.
On
the upper right, click “upload”
If you are overwriting a file, click the box for "Overwrite Existing".
Click "Add" to search for your document on your own PC.
Find your specific file(s).
You may upload multiple files at onceby holding down the CTRL key (Command key on a Mac) and individually clicking your file choices.
To upload many files at one time, zip them all up in a zip file
on your PC.
Then, in OU Campus….
Position yourself in your documents directory (or whatever directory you’re
wanting to upload docs into)
Click “upload” (upper right)
Click the radio button for “zip file”
Browse for the zip file on your PC
Click “Upload”
Click “Extract”
…and the system will upload all your docs into the directory (And of course,
they’ll be located in Production, not Staging.)
Choose
the template you desire for your page by clicking the graphic.
Enter the following information to create your new page:
Page Title
This appears on your webpage as its title, on the browser tab, and in the
breadcrumb....so don't make it cryptic (but make it normal English!) :)
Description
This is
important because it is the description that comes up on Google search
results. Just change the part in red to be your department name:
(ex. Campus Life at Tennessee State University,
Nashville, TN)
Keywords
These are
the words that web-surfers would use in a search engine such as Google.
Separate each by a comma.
Put every
word that would apply specifically to the page content on the web page you
are creating.
Use the
following as an example. Just change the part in red to be the items on your
specific web page:
8. Review your changes to ensure you have no mistakes.
9. “Publish Now” (green button at top).
10. Click “Publish” button (another little “publish” button at
the bottom).
Your change will now be live on the TSU website...and the system furnishes a link at the bottom for you to view your new webpage.
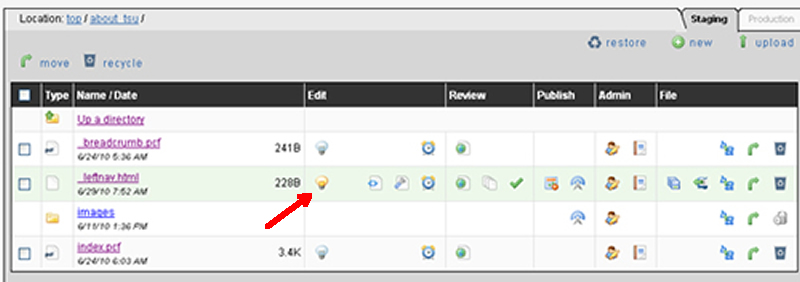
CHANGE EXISTING KEYWORDS
First, you have to check out the file (webpage). So click "Pages" near the top (in OU Campus) to view your file listing. Find your filename (webpage) and look at the lightbulb on its line. If it's white in color, that means the file is checked in. So click the lightbulb to check out the file (it will turn yellow when checked out).
Then, hover your filename and the menu items for that filename will appear over to the right. Hover "Edit" and click "Properties". There you will see your existing keywords and will be able to modify them.
SEARCH RESULTS ON TSU WEBSITE NOT ACCURATE
The TSU website uses Google for its search.
So if you’re seeing old information when you search for items, it’s either:
• old PDFs/docs that need to be deleted,
• content on a webpage that needs to be updated, or
• an entire web page that needs to be deleted.
So you have to look at the item that the Search is showing you. And you have to decide if it’s an old PDF that you need to delete….or if it’s one of the other two options above. Then you can take action….detailed below.
TO UPDATE INACCURATE ITEMS BEING RETURNED ON A SEARCH
Delete File or Web page (do this if the search is showing a web page that your department no longer wants to exist) Delete Images, PDFs, Documents (do this if the search shows an old PDF/doc that your department needs to delete) Edit Existing Webpages (do this if the search is linking to your department’s web page & the content on it needs to be updated)
HOW TO I MAKE MY PAGE FINDABLE ON SEARCH ENGINES?
If you're not able to find your page using Google or other search engines, you need to enhance your metadata (your page's "description" and "keywords").
For a web page that already exists, in order to alter the metadata for that page, do the following:
Login to OU Campus via the page as you normally do (as this mentioned here )
Near the top, on the line that has the "Preview" button, click the lightbulb-button to check out the webpage file.
Then click "Properties" on the same line.
In the "keywords" box, enter as many words about your web page as you can think of that persons searching for your site might enter into Google or another search engine. Be sure to separate each word with a comma. You may enter phrases too.
Also, in the "description", make sure it is accurately representing your web page. Be sure to put the web page's title as the first words in the "description" field.
Having the proper "keywords" will greatly enhance your page's findability on search engines such as Google.
After making your edits, be sure to save (bottom right).
UNLOCK PAGE/FILE
Help me! Someone wants to edit a file, but I have checked it out. How do I check it back in?
First, bring up the live page in a web browser (not in OU Campus)....and log into it as if you're going to edit it. Instructions
After you login to the page (& into OU Campus), Click the "Content" tab at the top....and choose "Pages".
In your file listing, find the page that you have checked out. It will have a yellow lightbulb. Click the yellow lightbult to make it white...which checks it in.
You're finished! :) You can now logout of OU Campus. And be sure to tell the person that you checked it back in!
RE-PUBLISH EXISTING WEB PAGE
1. Pull up your web page in a browser window (Firefox or Chrome).
2. Look at the bottom of your webpage in the footer and click
the link labeled “Last Modified…”
3. A screen pops up. (Note: If you get the error screen, just
click the link to continue.)
ALWAYS
after pasting, click the “Remove formatting” button (top row). This will
clean up any mal-formed HTML.
After
copying the content into OU, you can then alter the content on the webpage to
be accurate.
Click
the “Edit” button at the top and wait for the page to render. You will notice
green “Edit” buttons.
Click
the green “Edit” button for the section that you need to update.
Go
to your TSU webpage that has the content. Copy the content directly from the
webpage, not from inside of SiteDoc. Paste the content into the OU
editor.
**NOTE: Images will appear to copy over fine. But be
not deceived. They are referencing our old web server and will display
correctly now in OU, but not when we convert the system fully. So you must
delete the images that copied over.
Delete
any images that you copied from your website. And in their place, insert a
new image.
**IMPORTANT:
Once you’ve copied your content from the old web page into OU, click the
“Clean up messy code” button. It’s an icon on the 2nd row, near
the right. It looks like a paintbrush.
After
clicking it, you may alter your content however you wish. Use the existing
fonts to make your Title and Subtitle.
Save
your file.
Publish
your file (using the large green button at the top).
When
you publish web pages, put the date, your name, and the change made. This may
help you later to know what edits you last made to the page.
DELETING WEB ASSETS (IMAGES, PDFS,
DOCUMENTS, VIDEOS)
To stop images from displaying on a web page,
While editing the web page, just select the image & delete it (press del on keyboard).
To delete images, videos, or documents permanently from OU Campus because they are old: VIEW VIDEO: How to delete PDF, doc, image, video >>
First, get the name of the document (or image or video) you're wanting to delete...by looking at its URL.
HOW TO LOOK AT THE URL:
If you're deleting an image, do this to get its name/URL:
Right-click the image & choose "Open image in new window". The browser should have opened a new window (a new tab) in your browser. Go to that tab and you should see the image. Up at the top, take note of the URL to know where your image is actually stored. Observe the URL and match it to the following colored example below....so you can know where to find your file/doc in OU Campus.
For example, the following URL :
www.tnstate.edu/campus_life/images/services_hover.png means that:
the image is in the "campus_life" directory in OU Campus.....and is in the "images" folder.....and is named "services-hover.png"
.
If you're deleting a document (PDF, Word, etc.), do this to get its name:
Find the link on your web page that links to the document. Right-click the link and click "Copy Link Address".
Paste this link into an email....just so you can look at it.
Observe it and match it to the following colored example below....so you can know where to go to find your file/doc in OU Campus.
For example, the following URL :
www.tnstate.edu/campus_life/images/services_hover.png means that:
the image is in the "campus_life" directory in OU Campus.....and is in the "images" folder.....and is named "services-hover.png"
.
Then in OU Campus,
Click the “Content” tab (near the top) and choose “Pages”
On the right, click “Production” because your images, videos, and documents are housed in “Production”.
Now, based on the URL/path that you're were asked to observe above, browse into the appropriate folders to find your document/image/video. Then, simply hover it and choose to “Delete” it….and confirm deletion.
BACK
UP FILES BEFORE MAKING CHANGES TO THEM
DO NOT LOSE YOUR DATA!
Before
making edits to a file, back it up. On the menu list, in the Column entitled
“File”, click the Backup button.
In
the box that appears, type the reason you are changing the file. This may
come in handy for you later if you have to bring back a backed-up file.
Press
“Commit”.
UPCOMING
EVENTS BOX
To
edit "Upcoming Events", go into the file folder “includes”…and
alter the file named "upcomingevents". Be sure not to change the
format & spacing. Only alter the text and links because system is using
that format to construct the display properly on your page. The "more"
button automatically links to a page in your area named
"events.aspx"….so be sure you have a page in your dir named that.
This details the same instructions as the video above. NOTE: If you're linking to another TSU page, see section further below.
Type the text that you want to make into a link.
Highlight the text that you just typed.
Right-click the text you highlighted & choose "Insert/Edit Link".
Beside the “Link URL” box, click the reddish-browse button to browse for the webpage or document that you're linking to. If you're linking to a
document in your web area, then, of course, you have to go into your
"documents" folder in order to click on the correct document.
Once you've found the correct page or document to link to, click it.However,
if your file/PDF/doc is not in the directory because you haven't uploaded it
yet, do the following:
Click "Upload".
Click
"Browse" to browse your PC for the PDF that you want to upload.
Click
"Start Upload".
Your document should be highlighted in the file listing. Click "Insert" to insert it as your hyperlink.
For the field "Target", choose "Open in New Window"....so that your link/document will open in a new browser window.
Click “Insert”.
…and you have your link on your page!
EMAIL LINKS
Type the text that you want to make into a link.
Highlight the text that you just typed.
Click the icon/button in the top menu that looks like an envelope.
For "Recipient Email" enter the email address.
For "Mail Subject", enter the subject you'd like to be on the email.
To
make a "Table of Contents" at the top of your page (a set
of links to sections further down on the web page), do the following:
First,
you must name the sections below by bookmarking them (or anchor-tagging
them).
So,
scroll to the section below on the web page.
Place
your cursor in front of the heading for that section.
Click
the anchor-icon in the menu and name that place.
For
example, if you had a section further down on your page with the heading of
"Publications",
Place your cursor in front of "Publications".
Click the anchor-icon in the menu (on righthand side).
Type the word
"publications" (to name that spot on the page "publications").
Then,
you want to make a link near the top of your page that links to the anchor
tag (section) that you just made. To do so, follow these instructions:
Somewhere
near the top of your page (where you want to create the links/table-of-contents), type the text for your link....and then highlight
your text.
Click
the link-icon (chain-link) in the menu.
Instead of entering a URL like usual when you make a link, choose
the anchor tag that you'd like to link to.....and click "Update" at
the bottom.
So
for our example above, you would:
Somewhere near the top of your page, you'd type "Publications".
Highlight
the word "Publications".
Click the link-icon (chain-link) in the menu.
Notice
that the URL contains /records/online_forms.aspx.
So
I then know that the web page is in the “records” area in the OU
Campus system. And the web page's name is "online_forms.aspx".)
Then, in OU Campus, edit the page that you want to put the link
on:
Type the text you're making into a link and then highlight it.
Click the link button in the top menu.
Beside
the “Link URL” box, use the browse button to browse for the department's
directory (records, in my example) within the system. To
browse, click “main” in the upper left….and browse for the department's directory.
Then browse for the web page's name (online_forms.aspx, in my example)
and click it.
(Note:
If you were linking to a document in the Records area, you'd enter the
Records department's "documents" directory, and find the document
to click.
Then, install it on your PC. It’s
pretty easy to use. If it asks you to publish your slideshow, don’t
publish it. What we’ll do is take it from your PC & put it on our
server. I’ll work with you on that after you create the slideshow. You just
click “Make JAlbum” after you’ve uploaded all the pics. (btw, you can just
open a folder that has all of your pics in it & drag them over to
JAlbum….to get the pics into JAlbum. Then you just click “Make JAlbum”.
Then save it to your PC somewhere. Then upload it
If it ever asks you to sign-in,
don’t do that. You’re not wanting to use the online version…b/c it has very
limited space. You’re wanting to use the software that you download to your
own PC.
Give that a whirl & see if
you’re able to use JAlbum.
Drag and drop images with images
from your computer to the big empty area in the jAlbum application. You can
also use the "Add" button in the top left corner. jAlbum will ask
for an album name and album description. Tell the story of your album and
click "OK".
Skins are templates that add graphics
and functionality to your album. Select a skin for your album in the skin
select box. Most skins come in different graphical flavours called styles.
Pick a style in the style select box, to create the look you want. You can
read more about skins in the skin usage tutorial.
Push the "Make album"
button and the jAlbum app will scale your images for the web (without
touching your orginals) and make your album.
The album is now saved on your computer. You can preview it with the
preview button (magnifying glass) if you want.
If you're not satisfied with the result, go back and make some changes and
click the "Make album" again.
COPY ALBUM
Go to the location on your computer where JAlbum automatically-saved your album by doing the following:
Go to "My Documents" on your computer.
Look for the folder named "My Albums"....and copy the
folder named “album”.
Then, map a drive
(so you can paste your album to this place):
To map a drive on a PC:
Go to "My Computer"
Click "Tools" & choose "Map Network Drive"
For "Folder: ", enter \\phlox\share2
Paste your "album" folder into this place.
If it acts like you don’t have
permission or doesn’t paste, let me know. I may need to alter one more
thing.
NOTIFY
Log a ticket at www.tnstate.edu/trackit
stating which webpage you’d like the PhotoAlbum embedded on & we will
embed it for you.
(By the way, re-booting your PC will
also clear your browser cache.)
A good habit to get into is to re-boot your PC each day. That way,
you’ll know that you are starting with a cleared PC and browser cache each
day.
_________________________________
BREADCRUMB / BROWSER TAB - HOW TO ALTER TEXT
The following instructions explain how to alter the text that is displaying on the live page's breadcrumb/filepath....or on the browser tab.
If the breadcrumb (or browser tab) of your page is incorrect, it means the Page Parameter for title is incorrect.
To alter Page Parameters, do this:
Within OU Campus, click “Content” and choose “Pages”.
Find your web page (filename) in the file listing.
Check out your file by clicking on the white lightbulb beside your filename (if the lightbulb is already yellow, do not click it because you, obviously, already have your file checked out)
Then, hover your filename so that the file utilities (“Edit”, etc.) appear to the right.
Hover “Edit” & choose “Properties”.
For “Title”, change it to be what you want it to be.
Save and Publish.
This change will affect both the breadcrumb on your web page AND the browser tab....which is exactly what you want to happen. Be sure to publish your page again for it to take effect.
_________________________________
ACCESSIBILITY CHECK
*NOTE: These instructions apply ONLY to web editors who have been notified to do Accessibility Checking.
When you click the "Publish" button to make your page LIVE, you are presented with options like "Check Spelling" and "Accessibility".
Each time you publish your designated web page, click the "Accessibility" option and ensure that your web page has 4 errors or less.
If the page has more than 4 errors, please contact the TSU Webmaster (webmaster AT tnstate DOT edu) so the error(s) can be rectified.
** This Accessibility-checking is VERY important because it allows our physically-challenged web users to properly peruse our TSU website. Thank you for caring about them!
If
the breadcrumb for your page is inaccurate, edit the Properties (Props) for
your page. Change the Page Title. The breadcrumb comes from the Page Title.
Error Messages
ERROR: "The site name was not provided. Please try again, or contact technical support. S27"
SOLUTION: Please use Mozilla Firefox or Chrome instead of Internet Explorer.
IE Fix:
"Site Name not found" is occurring because Internet Explorer has “compatibility mode” turned on.
This
site will tell you about all invalid HTML on your page…..content that may not
display correctly on every browser in the world. HTML validator: http://validator.w3.org/#validate_by_input
Images
“Image
already exists” = message that user gets when they are not allowed to
upload images to that dir.
Change to a
directory that you have access to.
Can't
Upload Images
– First, check to make sure you're in the "Production" tab &
not the "Staging". If you're in "Production", then make
sure you're in the "images" folder.
Metadata
(example below):
Page Title: Student
Services
Description: Student
Services at Tennessee State University –Visit us for all your needs!
CIT-Web reserves the right to make any necessary corrections to
web pages not abiding by these design and content guidelines and any other
issues deemed erroneous for web-publication on our higher-education site.
HOMEPAGE
The homepage projects a particular image of TSU. Departments may
not interrupt this image-projection by insisting that certain content be
present on the homepage.